
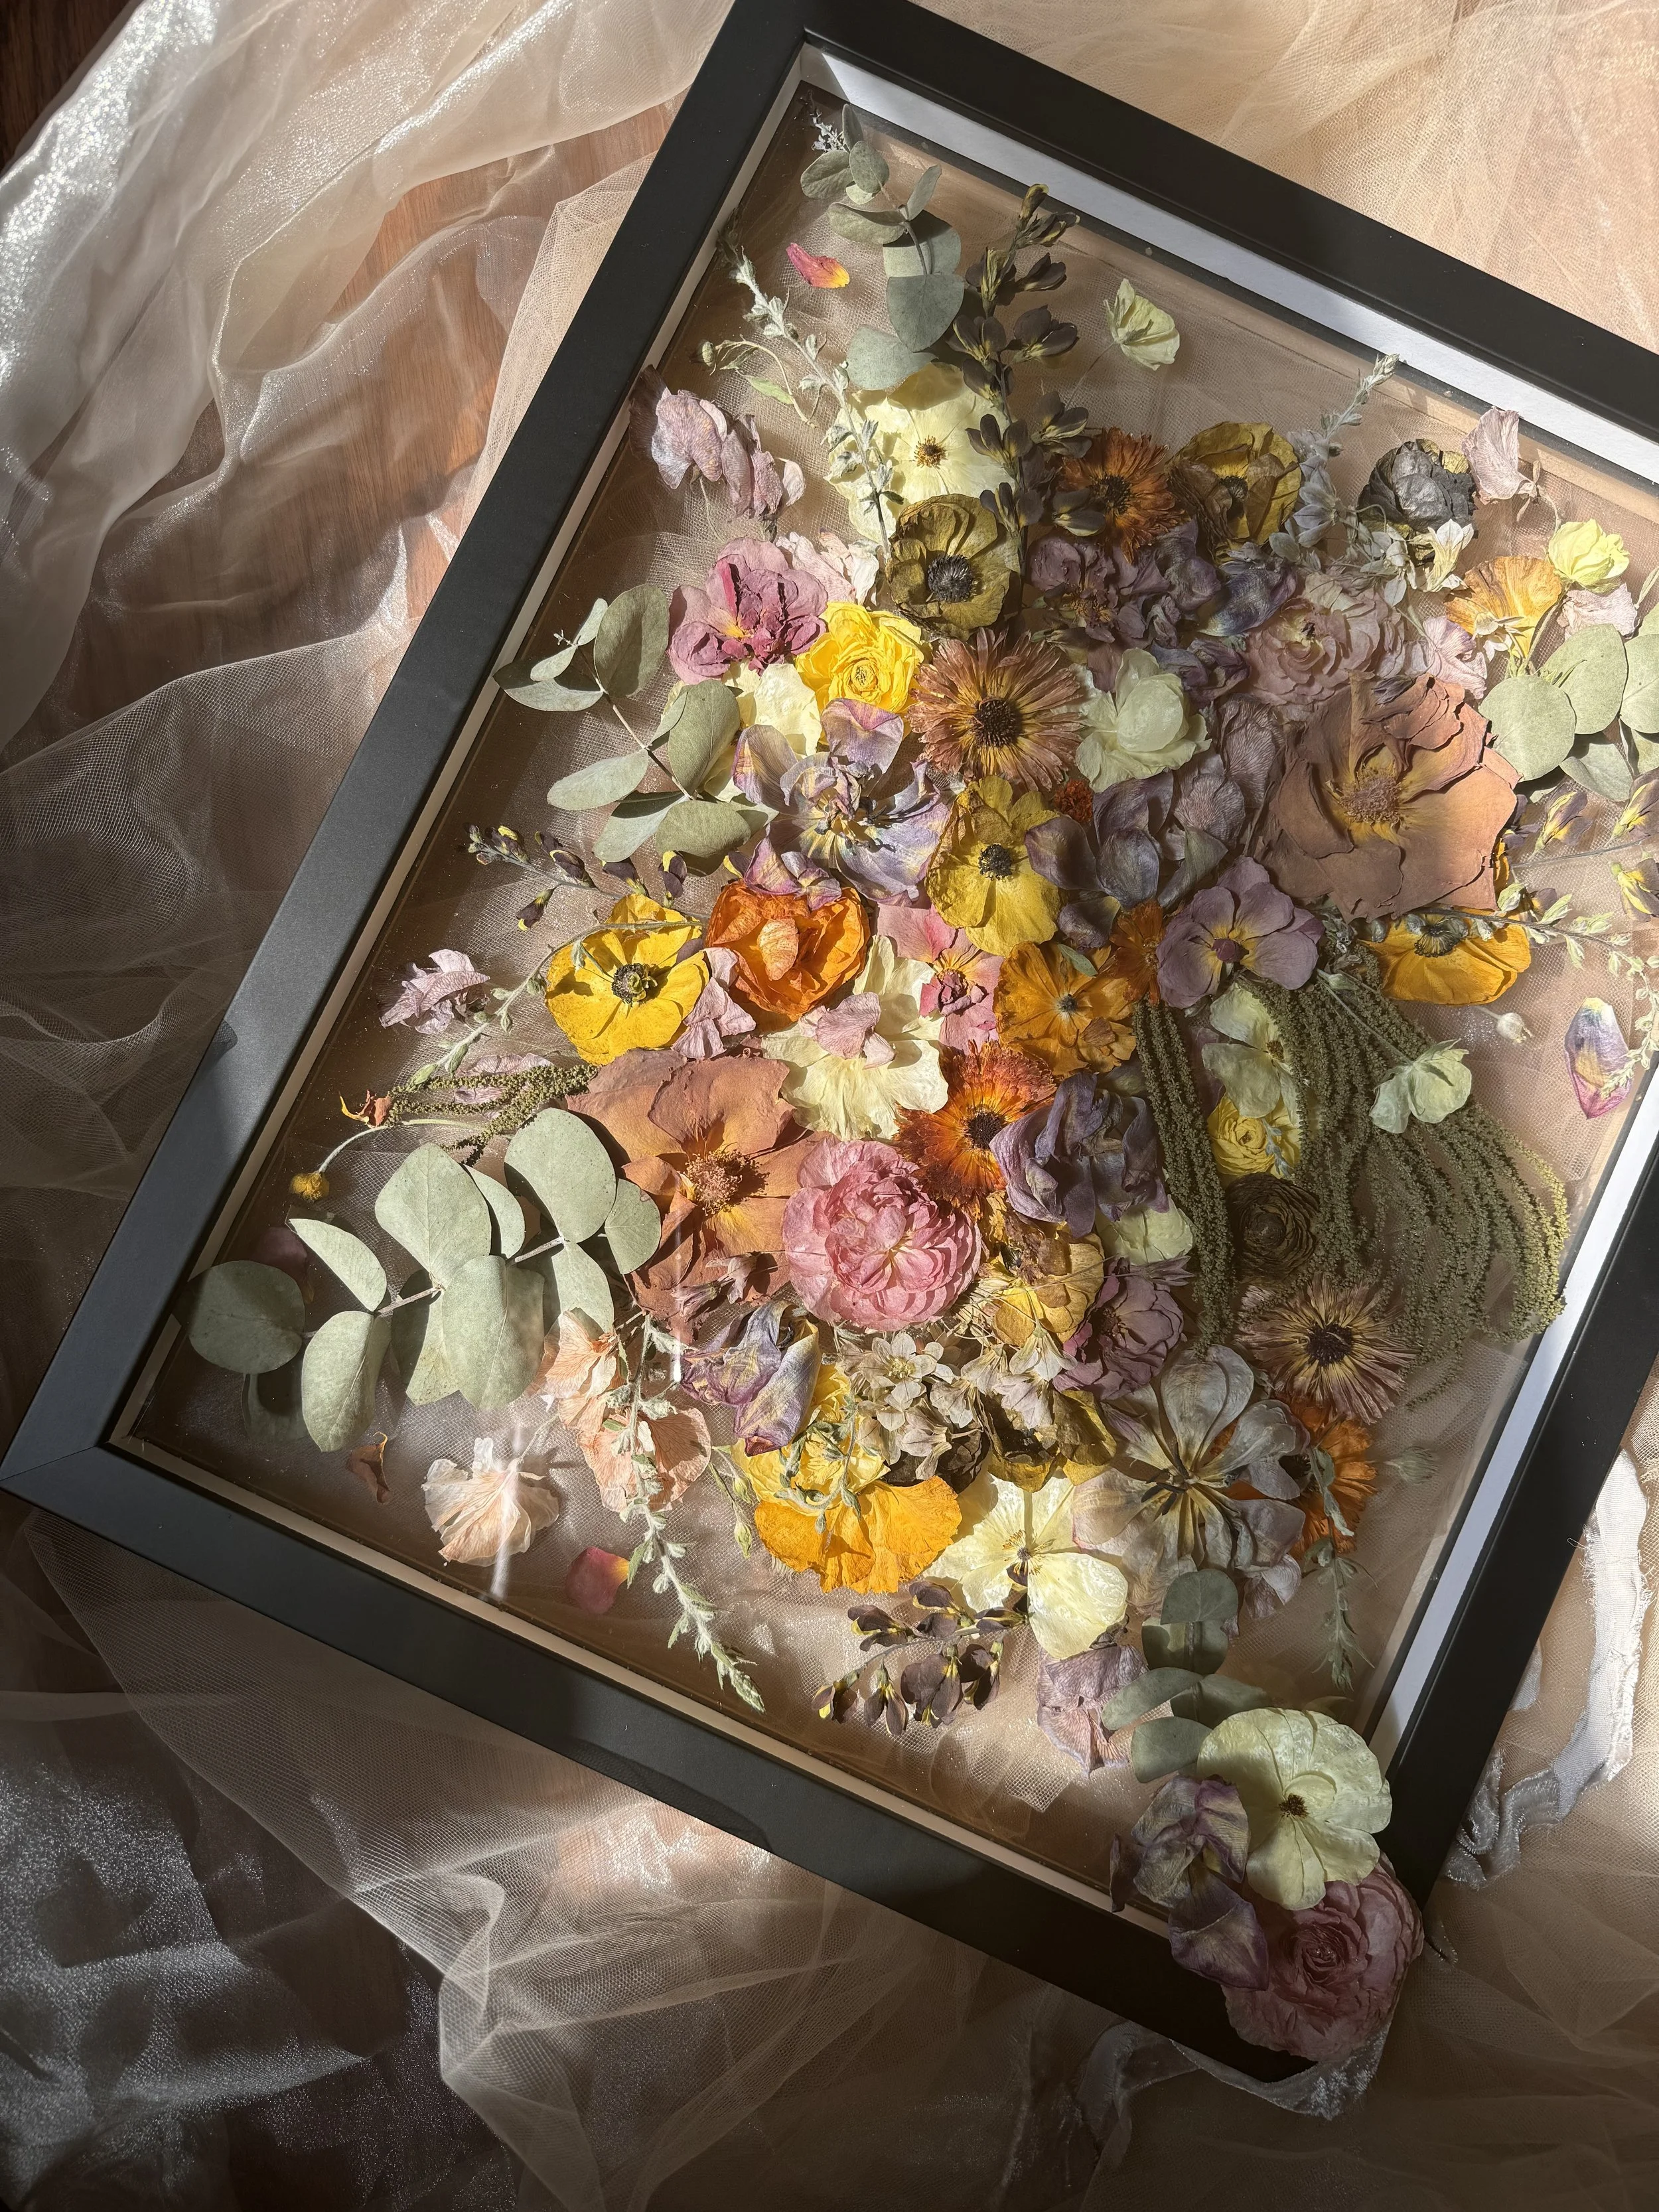
no color correction, thanks
Preserved flowers without col0r correction.
I fell in love with dried flowers when my mom hung up the yellow roses she got from my father. The way they transformed mesmerized me. The why behind saving them filled up my little heart. She always saved the best ones, changing them out throughout the years as older ones faded more or slowly crumbled—and all she did was keep them in a vase.
In my early 20s, I ended up working for a florist and wedding planner, being exposed to flowers I’d never seen before. At the end of one my shifts, as I was shoving flowers into a giant trash bag, I asked, “Can I take some of these home?”
I wanted to see how a rannuculus dried. I wanted to see how the blue of the delphiniums dried. For years, I dried these flowers and decorated my home with them, watching them as they faded and slowly crumbled. It was in 2017 when I started to make art with the dried flowers. I’d take them apart and create line art of women’s bodies with them. I’d arrange them into designs and adhere them to thrifted frames. I collected long stems to stick into wreaths. And I never did anything with it. Just admired them as they changed, faded, crumbled.
When I started Golden Preserved, I knew I wanted to set myself apart from other preservationists. I experimented with drying methods: the microwave, the oven, simply hanging them upside down, pressing them, and then I found silica. Silica felt like magic, it helps with color retention, but all flowers change once they are dried. And I like that.
I love that toffee roses turn purple. I love that white roses go cream. That the pale pinks can dry darker. That red roses go almost black. I don’t want to freeze time when I am working with your flowers. I want to show you what they can become.
IN MY OPINION, color correction just looks fake—even with the artists out there that are REALLY good. And that’s not something I want to bring into my business. I love the fact that this art changes over time, that your flowers take on a second life, and that it ages alongside you.
There is too much focus on perfection, on freezing time, and that’s not how I operate. Does that mean I don’t care about what your flowers look like? No, it means I find beauty in the change.
And if you choose me as your artist, then you find beauty in the change, too.

preserved flowers
Curious about what flowers preserve well? Hint, it’s not all of them.
It’s been a minute, but I’m not here to ramble or update. I just want a space to post my cute little canva flyers that will help guide any potential clients on what flowers preserve best.
If you click the link above, you’ll be redirected to a two-page document that lists out my favorite flowers to preserve and what you can expect from preserved flowers. If you have any questions, please don’t hesitate to e-mail me: hello@goldenpreserved.com
Also, when you are considering preserving your bouquet, tell your florist as they can help guide you as well.
framed flowers
I hated buying my frames from big box stores, but I wasn’t ready to invest. Then I had two broken frames in a row. I switched to ordering them online for them to only arrive broken. If I was going to continue growing my business, I had to consider the longevity of this art.
Honestly, it’s the same story for a huge chunk of my business. Failing enough, being annoyed enough, to finally step up. It was time to step up with frames in September of last year.
I went to this shop on the edge of downtown Asheville and talked to Jennifer. As a framer, she had never attempted what I envisioned. So we built it with her knowledge, products, and my quick learning.
It has conservation glass, the flowers are glued on acrylic, and the frames have about 1.5in depth. I’ve done one with a 5in depth and it gave me so much freedom with the design, I want to do more.
I have successfully made and shipped many of these frames with my reduce, reuse, plus extra bubblewrap packaging. It was all luck.
Recently one arrived smashed and I had to step it up again. Another thing I can’t get away with if I want to grow.
I have to consider the growth and longevity of this business. I have to protect the future of Golden Preserved and stop saying it’s slow growth when it’s just fear.

resin, a love letter.
The chemical reaction to resin, love.
Let’s chat more about resin. Now this is purely from my perspective, knowledge of the subject, and my raw emotions.
I wish it weren’t a part of GP. Or I wish I was busy enough to pass it on to someone else. Don’t get me wrong, it is cool. It is maybe the most satisfying final product that I have ever experienced, but lordy it is a torturous journey.
I’m gonna just type out all the things that go into resin and I may leave things out or I may repeat myself and this is a reminder that this blog is for me and google searches. I don’t expect you to read it.
The resin journey for flower preservation:
All the steps for drying your flowers must be done correctly so there is zero remaining moisture in your flowers.
All the silica must be knocked out so the resin doesn’t loosen it up and cloud up your resin.
You have to have serious PPE. A mask, gloves, and protective ware for your body so it doesn't get on your skin or clothes or in your hair. It’s also wise to have an air purifier in your space.
Gotta plug in the dehumidifier too. And the AC or the Heater. There is a balance to the humidity and temperature you need for not only your space, but also the resin and the molds. Cold mold, perfect temp resin, baby bubbles on the bottom. Resin too hot, room too cold—flash cure and warping. I’ve only had resin smoke on me once, but I’ve heard it can start fires. And that is terrifying.
Pick the right resin for the right project and just because you’re making art, doesn’t mean you use art resin. Also, not all resin is good resin. Each one feels like it has its deficiencies.
Those first 5 steps are just like kinda getting myself ready! There’s cleaning up the hardened resin from previous projects, shuffling the projects around and making space for new ones, demolding and cleaning the molds, and just generally making sure my space is as organized as possible before starting.
I weigh my resin using grams because I’m not at the stage in my business where I can just dump both products fully into their bucket. One day.
And then I stir. For what feels like forever. I scrape the sides and get rid of the cloudiness, pour it into a fresh cup, and continue stirring. This is my LEAST favorite part. I hate standing and stirring. It hurts, it’s tedious, it’s so delicate because if you don’t do it long enough, you’ll ruin your project. If you do it for too long, you’ll ruin your project. If you do it too fast, ruined. It’s the most annoying.
Then that lil baby goes into a vacuum chamber and I just recently realized I was using it wrong and I am so lucky I didn’t blow anything up. This part is pretty magical because you just suck all the bubbles out, but you have to be careful because it can explode out of the cup and all over the inside of your chamber, and cleaning it out is a nightmare.
Pouring time feels like the homestretch, right? Pour then done. Each piece gets poured in layers and varies with each size. Sometimes, that whole cup will just go in one person’s order.
And I currently have 15 client orders on the table who all need their next layer or first layer or final layer. I feel lucky when I get to hit all orders with one mix, but that hasn’t been the case since moving into the new studio and having more space.
So let’s say your order is coasters, a round tray, and a ring holder. Each piece gets its first pour and flowers are set in their place—for the ring holder, upside down! Then you wait 24hr before going at it again. The ringholder only takes two pours. The coasters ideally take two, sometimes take three. The round tray, five. But again, there are other clients on the table, too.
After all those pours, surely you just pop it out and good to go. No. They sit in their mold for at least a week to make sure they are fully cured.
After removal, they sit again for another week or two because there is no way I am ruining your piece by sanding too early.
SANDING. Sanding is so messy so I do it outside and I try to wait until I have a lot to sand at once because I hate it so much. I like it better that I upgraded my sander, but it’s still just it’s whole other thing.
You have to be so diligent in cleaning out the resin dust if there were bubbles that rose to the top. Flowers are notorious for releasing bubbles even after you checked your pieces every half hour until you felt it was safe to leave the house.
I used to be like, “Oh I don’t need to sand and topcoat all my pieces,” but it’s totally a quality thing and I know better now and I can’t just get away without topcoating. Except with the little jewelry catches. Those are the best and don’t need it and are perfect in every way.
Next you gotta put glue on the back to protect it. Another day of waiting, but usually more, because I also like to make sure I have enough space for top coats.
Top coats are a whole other skill! That resin is more time and temperature-sensitive and I haven’t figured out the timing of it in the vacuum chamber because I did it once and it smoked and it was scary and I haven’t tried since. I also don’t like the art or tabletop resin for it because I’ve had such trouble with microbubbles. iCoat makes a thinner one that works way better, but top coats have to be applied very thin and you have to be super quick with the heat gun because overusing it can destroy all your hard work. And they need more space than a regular pour because there’s all this spillage that has to happen. I guess that’s technically considered a floodcoat. I find floodcoats are more successful for me—if I just do a top coat then I always get it too thick and there are microbubbles. And then you have to sand that off and do it all over. With wait time in between, of course.
Then you’re done.
Not.
Then you wait 24HR for all the cleanup and to make sure everything worked out according to plan and you don’t need to redo it because just this one part didn’t get covered. Or a spider decided to land on it.
Then you clean up the back, clean up your edges, give it a little polish, and then let it sit in the dark for another week.
You have to give time to make sure your resin piece is perfectly cured and ready to be packed up.
Then it’s waiting on the other pieces, then photography time. And it’s so pretty. And I’m so proud. And maybe it took 6-8 months because there’s a lot more to it than what you’re shown on the internet.
There’s a ton of education behind this art and the majority of the clients understand this and some just don’t. And are kinda brats about it. And that’s the hard part behind resin, too. Because it can’t be rushed. It physically and chemically can’t be.
And I wish every one could understand the love/hate relationship you can have with a certain part of your art. I’m going to keep working on resin, keep improving and expanding, but man I am excited for the day when I can pass that mixing onto someone else. I’ll take over when it’s time to pour and pop bubbles, but they have to sit and wait for late ones to pop up.

happy two years, gp.
Happy second anniversary to Golden Preserved.
Tried to embed the promo video, but the file is just like too big and trippin’ and I don’t do youtube, so here is the tiktok :)
For the past couple of days I’ve been going through old pictures and videos, going back in time to the first thing I made with dried flowers, traveling past the things I gave to friends, tried to sell at markets, my first bridal bouquet. Thought about all the other skills I learned, people I met, things that shaped me.
I don’t know what the future holds for GP; I don’t know what stage I’m at with it, but I’m so proud of how far I’ve come.

april showers, may flowers
New beginnings with Golden Preserved.
Hiii hello friends of flowers! Since our last chat, my husband and I bought a house. Yeah, I know. Crazy. A lil small business owner and a therapist now have a ranch-style, two-level home that sits atop a lil hill near the Pigeon River. It was always the plan to invest and not watch our lives whither away renting in Asheville, NC. We are very lucky to be able to do this with the help of my business investors, our dads, and my EXCELLENT Zillow skills in finding this literal gem. We’re only like 20min outside of town.
Golden Preserved really needed the upgrade, too. I have all of these ideas and hopes for our new home, but I know I need to settle down and be realistic. I need to work on the house in the ebb of the flow of flower preservation. So, see you in July half bath. And the kitchen, the big bath, and the downstairs bath. Imagine just a very 90s home. We love it and we’ll nurture it and upgrade it and grow here.
Golden Preserved currently has a designated resin room! This way I can do a pour and then head to my office or the main studio to continue working without having to keep my mask on or getting a migraine and risking my lungs. I can just shut those toxic fumes away. Oh, did you not know that? RESIN IS TOXIC. It releases fumes, it can overheat and smoke and burn, it can never cure and be sticky, it can irritate your skin. Here, an actual statement from a health department: The main effects of overexposure are irritation of the eyes, nose, throat, and skin, skin allergies, and asthma. The solvent additives can cause other effects such as headaches, dizziness, and confusion.
There, now you’ve learned something from me. So when you hear someone complain about flower preservation or how much it costs or how easy it looks, you can say, ACTUALLY…
I got off on a tangent. Whatever.
Stick around, learn more, follow on the ‘gram, and save the bouquet!
Necessary SEOs for the google gods:
preserved flowers
flower preservation
asheville bouquet preservation

blog, part two.
I’ll let my WordPress fizzle out into the internet abyss, just like my LiveJournal and Photobucket. Welcome to the new blog, where I ramble a little bit and then post SEOs :)
Maybe eventually I’ll talk about the topics below or maybe it will forever be a ramble and chat gpt update on the keywords that can help websites and businesses in the flower preservation industry optimize their content for search engines and attract potential customers looking for these services.
Flower preservation services
Bouquet preservation techniques
Memorial flower preservation
Preserve funeral flowers
How to preserve wedding bouquet
DIY flower preservation tips
Flower drying methods
Pressed flower art
Preserve memorial flowers
Eternal bouquet preservation
Catch ya on the flip side,
Tia Lorraine